 This is the Archived Desktop Edition.
You should be transferred to the Newest Edition for Desktop and Mobile within 2 seconds.
Basic Patient Care Procedures
3-4
3-4. MAKING THE AMBULATORY PATIENT'S BED
a. General. An ambulatory patient is one who is able to walk, and therefore, not confined to bed. Except for the equipment used and minor differences concerning the folding of the top covers and the cleaning required, the ambulatory patient's bed (also referred to as an occupied open bed) and an unoccupied closed bed (made after terminal cleaning of a bed unit) are generally made in like manner. Generally, in an unoccupied closed bed the top covers are not folded back in order to maintain clean inner surfaces. A check is made of the condition of the plastic mattress cover and plastic pillow cover and they are replaced as necessary. In addition, before this bed is made, the cleaning will have been done and all linen, blanket, and bedspread must be clean. The following equipment and procedures relate to making an unoccupied open bed routinely on a daily basis. Linen is changed as required, in consonance with local nursing unit policy.
b. Equipment. The daily allowance of clean linen including towel and washcloth is obtained as required. Other equipment consists of the following:
(1) Washbasin containing detergent-germicide solution.
(2) Cleaning cloth.
(3) Clothes hamper.
(4) Paper bag.
c. Preliminary Procedures.
(1) Assemble the materials at the bedside, placing the clean linen on the chair in the order of use--pillow, pillowcase, spread, blanket, and sheets on top. Then move the bedside cabinet and chair away from the bed and adjust the bed to a level (horizontal) position. Turn the bed crank handle inward to prevent injury.
(2) Strip the bed and tighten the mattress cover from head to foot. Strip the bed according to the following:
(a) Remove the soiled pillowcase and place it in the clothes hamper. Place the pillows against the chair back.
(b) Loosen all linen while moving around the bed, raising the mattress lightly and lifting the linen edges free. Do not tug the linen as this may cause the linen to snag on the springs.
(c) If any item of linen is to be reused, fold the linen as it is removed from the bed and place it on the clothes hamper.
NOTE: If a linen hamper is not available within or adjacent to the bed unit, hang the used pillowcase on the back of the chair to receive the soiled linen. Do not
allow soiled linen to touch the floor.
d. Steps in Bed Making. The bed is made in the following manner, completing one side before going to the other.
(1) Step 1. Place the bottom sheet on the mattress. Center it lengthwise; fold at midline with the hem seam down and the bottom hem even with the foot edge. Unfold the sheet across the bed. Tuck the surplus under the head of the mattress. Pull the excess sheet taut and smooth over the top edge of the mattress, tightening it from the underside of the mattress (figure 3-2).
(2) Step 2. To miter the corner, pick up a hanging side of the sheet edge about 12 inches from the head of the mattress. Lay it back on the mattress in a triangle fold.
(3) Step 3. Tuck the hanging corner of the sheet under the mattress, holding your hands palm down to protect your knuckles from the bedspring.
(4) Step 4. Place your hand at the side of the mattress and even with the top edge. Bring the triangle fold down over your hand to ensure a firm, smooth mitered corner.
(5) Step 5. Tuck the sheet under the mattress working from top to bottom. If mitered properly, the sheet will be smooth and neat when the bed is occupied, and when the Gatch bed is elevated.
(6) Step 6. Center the top sheet on the foundation (previously placed sheets) with the hem seam up and even with the head edge of the mattress. Permit the surplus to extend at the foot.
(7) Step 7. Center the blanket with the edge approximately 8 inches (about one handspan) from the head edge of the mattress and the surplus at the foot.
(8) Step 8. Center the spread or sheet with the edge even with the head of the mattress and the surplus at the foot.
(9) Step 9. Place your hand under the foot end of the side of the mattress to hold the foundation sheet taut while raising the mattress slightly. Smooth and tuck the top sheet, blanket, and spread under the foot of the mattress. Miter the corner. Leave the side of the top covers hanging free.

Figure 3-2. Making a bed (continued)
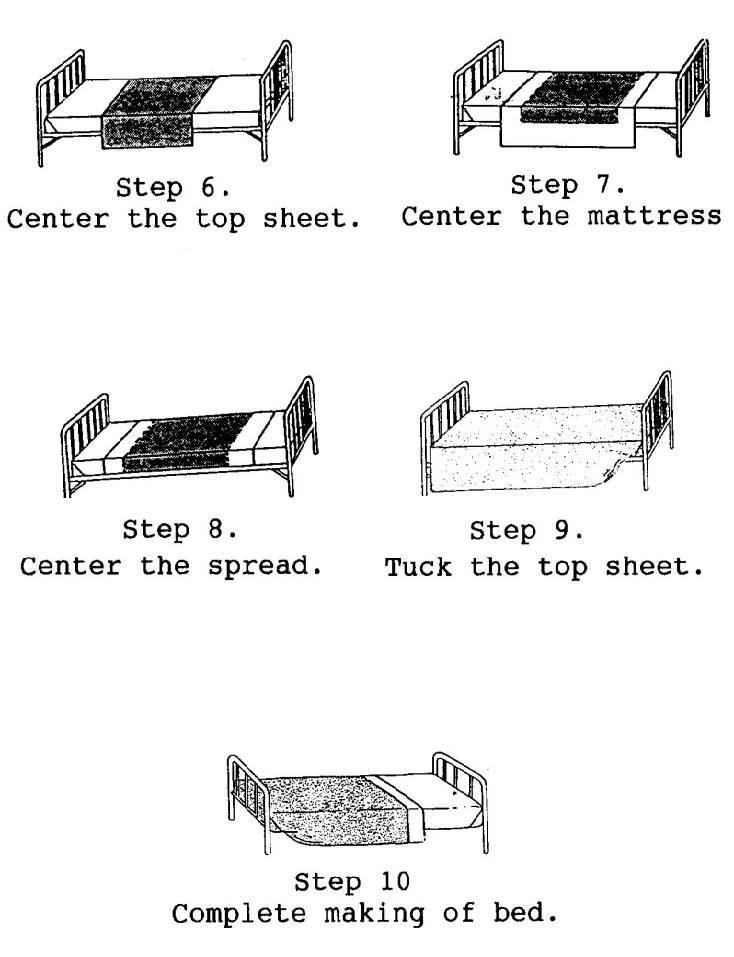
Figure 3-2. Making a bed (concluded)
(10) Step 10. Go to the opposite side of the bed and complete the making of the bed as follows:
(a) In sequence, fold back the spread, blanket, top sheet, and, if used, the drawsheet and protective sheet to the center of the bed.
(b) Smooth and straighten the foundation sheet, maturing the top corner and pulling the sheet taut while tucking the side under the mattress from head to foot. If used, pull the protective and drawsheets taut and tuck them under the mattress.
(c) Bring over the top covers in succession. Tuck them under at the foot and miter the corner.
(d) Fold the top edge of the spread under the blanket edge; then bring the top sheet over to form a cuff and fanfold the bedding half-way to the foot of the bed.
NOTE: Do not form a cuff when preparing a closed bed.
(11) Step 11. Replace the pillowcase and pillow (figure 3-3).
(a) Gather the open-end portion of the pillowcase to about midway of the pillowcase length.
(b) Fit the pillow in the case with one hand while continuing to hold the gathered edges with the other.
(c) Move one hand to the closed end grasping the pillowcase and the pillow within. With the other hand, extend the pillowcase so that it covers the pillow.
(d) Fit the pillow into the corner on one side of the pillowcase and pleat the excess under at the opposite side.
(e) Place the pillow neatly at the head of the bed with the open end of the case away from the door.
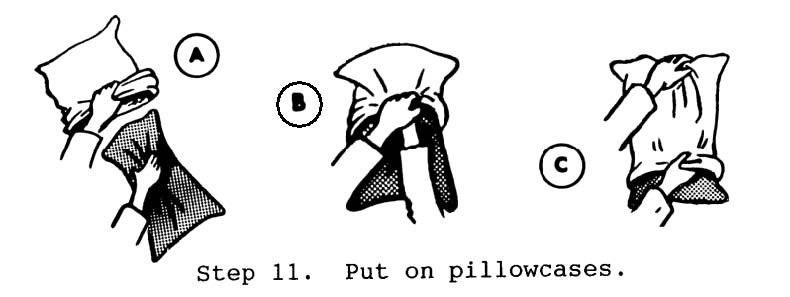
Figure 3-3. Putting on pillowcases.
e. Concurrent Cleaning.
(1) Damp-dust bedside cabinet, bedframe, and chair.
(2) Realign the bed, bedside cabinet, and chair. Turn inward the bed wheels and crank handles. Lock the wheels.
(3) Hang a clean paper bag by securing the tab edge between the surfaces of the bedside cabinet top. (Tear down the sides of the bag to form 2-inch tabs. Fold three sides outward to form a cuff; the fourth side is the hanger. Folding in this manner provides clean surfaces for handling.) A paper bag is used for disposal of tissue wipes and other personal debris. It is not used for soiled dressings.
(4) Leave the unit clean, orderly, and ready for occupancy. Check to see that the lamp and signal cord (if used) is in the proper location.
(5) Discard the waste. Wash and sanitize the washbasin and wash your hands.
