 This is the Archived Desktop Edition.
You should be transferred to the Newest Edition for Desktop and Mobile within 2 seconds.
Intravenous Infusions and Related Tasks
Lesson 2: Obtain a Blood Sample
2-3
2-3. PROCEDURE FOR OBTAINING A BLOOD SPECIMEN
a. Verify Request to Obtain Blood Specimen. The following may be used to verify an order to obtain a blood specimen.
(1) Therapeutic Documentation Care Plan (Non-medication), DA Form 4677.
(2) Provider's orders.
(3) Supervisor's directive.
b. Gather Equipment. Collect the following equipment (see figure 2-1).
®. The Vacutainer® consists of a plastic holder into which a sterile disposable double-ended needle is inserted. A vacuum tube with a rubber stopper slips into the barrel of the holder. The needle should not penetrate the stopper until the vein end of the double-ended needle has been inserted into the vein. After the needle enters the vein, the tube is pushed the remaining distance into the barrel. The vacuum in the tube will withdraw blood from the vein.(1) Blood specimen tube. Obtain the proper blood specimen tube based upon your supervisor's directive, ward standing operating procedures (SOP), or laboratory SOP. The type of tube needed will depend on the specific test to be performed. Some tests require a blood specimen that has not been allowed to clot. In this case, a blood specimen tube containing a powdered or liquid anticoagulant is used. If coagulated (clotted) blood is acceptable, other types of tubes are used. Many laboratories use a color code for tubes or bottles required for different tests.
(2) Vacutainer
(3) Constricting band or tourniquet. Constricting bands commonly used are made of soft, flat or round latex rubber. Commercial types of constricting bands have a Velcro fastening device.
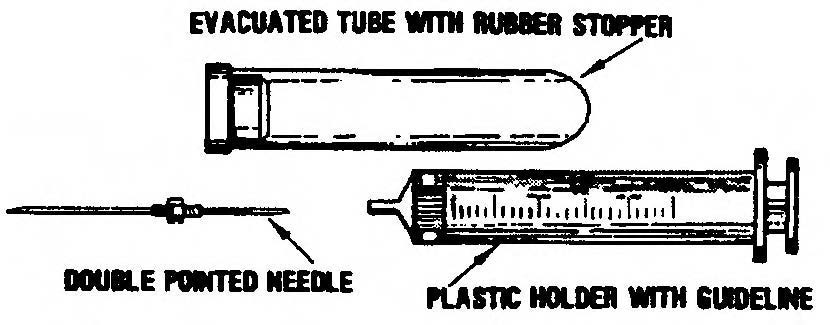
Figure 2-1. Vacutainer® system.
(4) Vacutainer
® needle. There are two types of needles available for use with the Vacutainer®. One is designed for drawing single specimens; the other is used for drawing multiple blood samples. A rubber sheath covers the shaft of the multiple sample needle. As the needle is removed from the rubber stoppered tube, the sheath slips back to cover and seals the end of the needle, thus preventing blood from dripping into the holder.(5) Antiseptic sponge or pledget such as Betadine or alcohol. These are used to clean the skin before the venipuncture is done. Betadine has been demonstrated to be more effective in reducing the number of skin pathogens than alcohol.
(6) Other items. Other items include a protective pad, sterile 2-inch by 2- inch gauze sponge(s), a self-adhesive bandage, a rubber band, and labels to identify the blood specimen tube(s).
c. Label Specimen Tube(s). Stamp the label with the patient's addressograph plate or clearly write the patient's identifying information on the label and apply it to the specimen tube. The following information should be printed on the label.
(1) Name of patient.
(2) Hospitalization number.
(3) Social security number.
(4) Date and time specimen was drawn.
(5) Other data as required by local SOP.
d. Perform Handwash. Perform a patient care handwash.
e. Assemble Vacutainer
® and Needle.® needle from package as you did when you were assembling a needle and syringe.(1) Remove Vacutainer
(2) Insert the short end of needle into the threaded end of the Vacutainer
®. Screw it tightly using a clockwise motion.f. Explain Procedure. Explain the procedure to the patient.
g. Expose Area for Venipuncture. Expose the selected area. Usually, the inner elbow is used to obtain a specimen, although the forearm, wrist, or hand can be used. See figure 2-2 for the location of some of the veins.
(1) Assist the patient to expose elbow area of arm by rolling the sleeve to above the elbow (if applicable). In some instances, it may be necessary to have the patient remove his garment.
(2) Fully extend the patient's arm with the palm up.
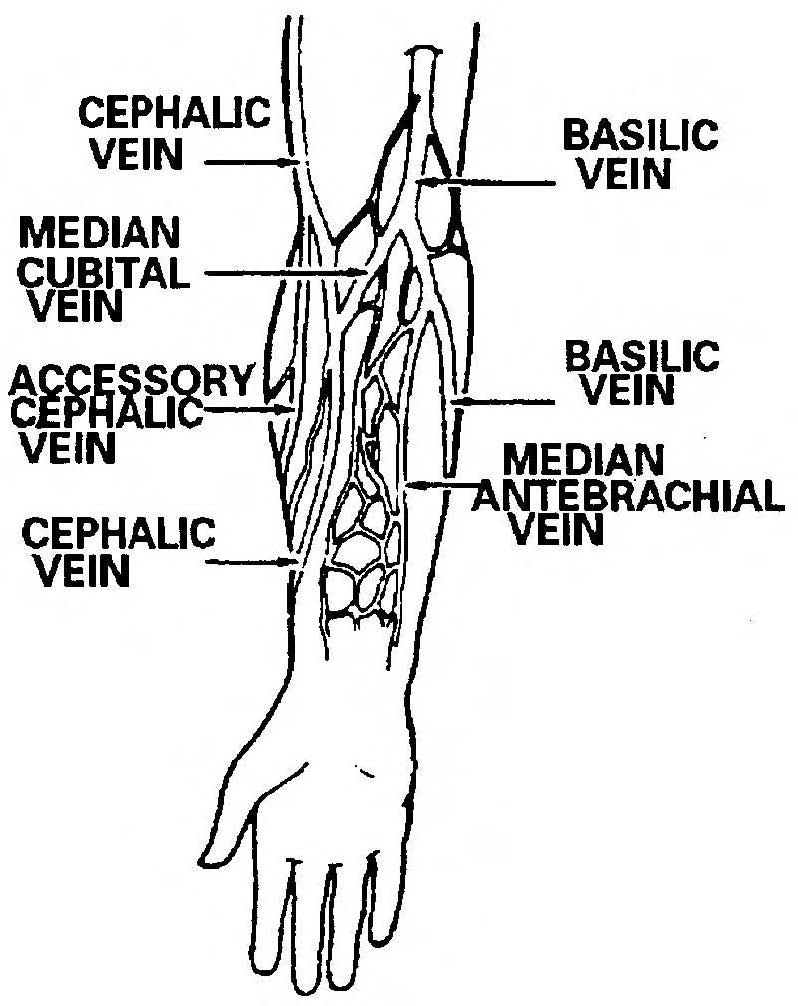
Figure 2-2. Veins.
h. Select Vein for Venipuncture. Select the vein as follows:
(1) Palpate or feel the arm by using your fingers to locate an appropriate vein.
(2) Select one of the prominent veins in the antecubital fossa of the arm. The antecubital fossa is the hollow or depressed area located in the joint between the arm and the forearm.
(a) The median cubital vein, though not always visible, is usually large and palpable. Since it is well supported and the least apt to roll (move away from pressure), it is the vein of choice for venipuncture.
(b) The second choice is the cephalic vein. The basilic vein, though oftentimes the most prominent, is apt to be the least desirable because it tends to roll easily, making venipuncture difficult.
i. Position Protective Pad. Place the protective pad under the patient's extended elbow and forearm to protect his clothing and the work surface.
j. Prepare Sponge for Use. Open the betadine or alcohol pledget (sponge) and 2-inch by 2-inch gauze and place the open package within easy reach.
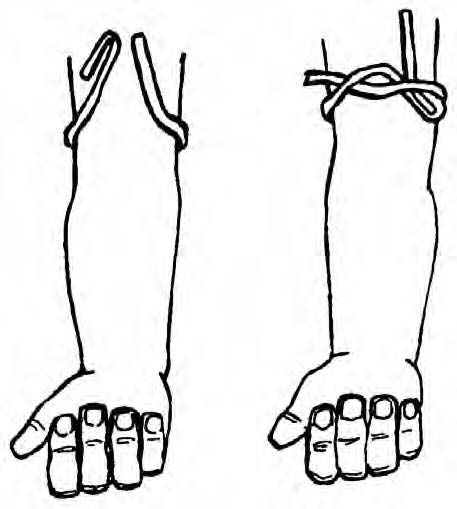
k. Apply Constricting Band. Use the following procedures to apply the constricting band (see figure 2-3).
(1) Place the constricting band around the limb approximately two inches above the proposed venipuncture site.
Figure 2-3. Constricting band.
(2) The constricting band must be applied with sufficient pressure to stop venous return without stopping the arterial flow.
l. Prepare the Vein. Instruct the patient to form a fist and clench and unclench his fist several times and then hold the hand in a clenched position. Clenching and unclenching the fist with a constricting band in place causes the blood to be trapped in the veins which causes the veins to distend. If the vein does not distend, gently tapping the site with your fingers may assist in raising the vein.
m. Palpate Selected Vein. Palpate the vein lightly with the index finger, moving an inch or two above and below the site so that you can determine the size and direction of the vein (figure 2-4). The vein should feel like a spongy tube.
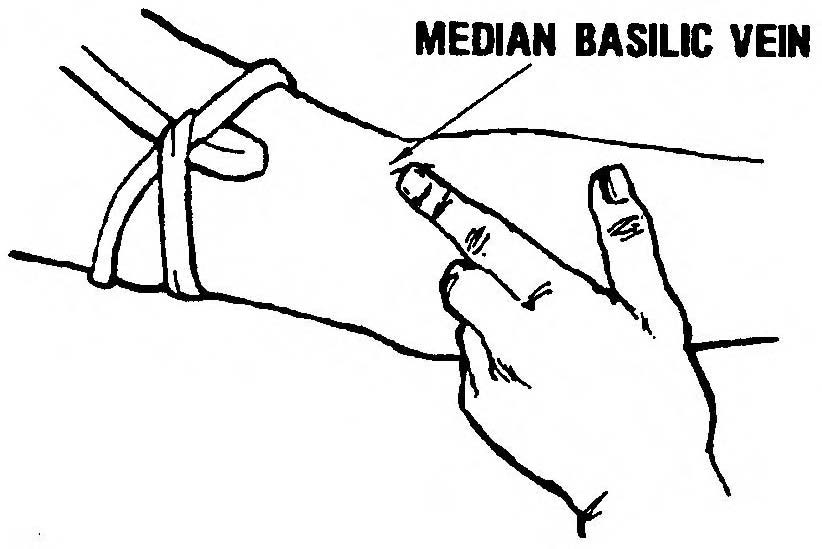
Figure 2-4. Palpating the vein.
n. Cleanse Skin. Cleanse the skin with the pledget (sponge) starting on the site and cleansing in a spiral motion outward and away from the selected venipuncture site. Do not retrace your motion. Cleansing the skin in this manner will move the surface skin contaminants away from the proposed venipuncture site.
CAUTION: After cleansing the skin, do not repalpate the area.
o. Prepare to Puncture Vein.
® unit and remove the protective cover from the needle.(1) Grasp the Vacutainer
(2) Position the needle parallel to and above the vein and grasp the patient's arm below the point of entry with the free hand.
(3) Place the thumb approximately one inch below the expected point of entry and pull the skin taut and toward the hand.
p. Puncture Vein. Puncture the vein in the following manner.
(1) Place the needle bevel up in line with the vein and pierce the skin at approximately a 15 to 45 degree angle. (Entering with the bevel up causes the sharp tip to pierce the skin first, paving the way for the rest of the needle. Entering the vein with the bevel down will cause painful tearing of the skin.)
(2) Decrease the angle of the needle until it is almost parallel to the skin surface. Direct the needle toward the vein and pierce the vein wall.
(a) A faint "give" will be felt when the vein is entered and the tube will begin filling with blood.
(b) If venipuncture is unsuccessful (vein wall is not punctured), pull the needle back slightly (not above the skin surface) and attempt to direct the point of the needle into the vein again.
(c) If the venipuncture is still unsuccessful, release the constricting band, place a 2-inch by 2-inch sponge lightly over the venipuncture site, quickly withdraw the needle, and immediately apply firm pressure over the site.
(3) Once the needle is withdrawn from under the skin surface, do not reuse the needle. If a second attempt at venipuncture is required, notify the supervisor, obtain a new needle, and repeat the procedure.
q. Collect Specimen. When you have successfully punctured the vein, complete the following steps to collect the blood sample.
® unit and needle steady with your dominant hand. If the unit and needle are not held steady while pushing in the tube, the needle may either slip out of the vein or puncture the opposing vein wall.(1) Hold the Vacutainer
(2) Place the tips of the index and middle fingers behind the flange of the Vacutainer
®. Push the tube all the way into the Vacutainer® with your thumb until the needle completely punctures the rubber stopper.(3) If the needle is in the vein, the vacuum will draw the blood into the tube.
(4) Instruct the patient to relax and unclench his fist after the needle has entered the vein. Release the constricting band when the tube is full.
(5) Carefully pull the tube downward, off the tube end of the needle and out of the Vacutainer
®. Make sure to stabilize the Vacutainer® and needle with your other hand during the process. If more than one specimen is needed, push another tube onto the needle. Continue exchanging the tubes until the required number have been filled.NOTE: After venipuncture technique has been mastered and manual dexterity is present, either hand may be used in completing blood drawing as long as the needle is securely stabilized.
(6) After obtaining the blood required and the last tube is approximately twothirds full of blood or the blood stops, prepare to withdraw the needle.
r. Withdraw Needle. Withdraw the needle in the following manner.
® fasteners open. Never withdraw the needle prior to removing the constricting band as this will cause blood to be forced out of the venipuncture site with resulting blood loss and/or hematoma formation.(1) Release the constricting band by pulling on the long, looped end of the tubing or pull the Velcro
(2) Place the sterile 2-inch by 2-inch sponge lightly over the venipuncture site.
(3) Withdraw the needle smoothly and quickly and immediately apply firm manual pressure over the venipuncture site with the 2-inch by 2-inch sponge. Keeping the patient's arm fully extended will minimize leakage around and through the venipuncture site. This aids in the prevention of bruising and hematoma formation.
(4) Instruct the patient to elevate the arm slightly. Keep the arm fully extended and continue to apply firm manual pressure to site for two to three minutes.
(a) If the patient is unable to apply pressure and elevate the site, the pressure and elevation must be done by the medical specialist.
(b) Continued bleeding is a complication of a patient receiving anticoagulant therapy. Anticoagulants are usually given to prevent the development of blood clots in the circulatory system. Anticoagulant patients may bleed longer than other patients. Manual pressure applied for a longer period of time will be required to stop the bleeding.
(c) A hematoma is a swelling caused by the collection of blood under the skin or in damaged tissues as a result of an injured or broken blood vessel. They are the most common complication of routine venipuncture for withdrawing blood. They may result from puncturing and exiting the other side of the vein or from incomplete insertion of the needle into the vein. Hematomas can also result from continued application of the constricting band after a successful or unsuccessful attempt has been made to draw blood. Hematomas most frequently result from insufficient time spent in applying pressure following venipuncture and from flexing the arm.
s. Remove Specimen Tube from Vacutainer
®. Pull the tube out of the Vacutainer® and remove the needle from the holder using an approved safety device such as a toothed grip on the sharps disposal box. Do not recap the needle. If the specimen tube contains an anticoagulant or other fixing agent (as evidenced by white powder particles or liquid in tube), gently invert tube several times to mix it with the blood. Label all tubes promptly with patient identification and other information as required by local SOP.t. Apply Bandage. Apply a self-adhesive bandage to the venipuncture site after the bleeding has stopped. Self-adhesive bandages do not take the place of pressure.
u. Provide for Patient's Safety and Comfort. Provide for patient's safety and comfort as follows:
(1) Remove protective pad.
(2) Assist patient to roll down sleeve, if applicable.
(3) Assist patient to assume a position of comfort, if applicable.
(4) Place personal items and call-light within easy reach, if applicable.
(5) Raise side rails, if applicable.
v. Dispose of and/or Store Equipment. Take care of equipment storage/disposal.
(1) Collect all equipment and dispose or store in accordance with (IAW) local SOP.
(2) Do not recap needle at any time; dispose of it in an approved, punctureproof container as close to the work area as possible.
w. Perform Handwash. Perform a patient care handwash.
x. Check Completeness of Laboratory Request. Obtain completed laboratory request from the supervisor and check the request. (There may be many lab request slips that are used for requesting specific blood tests.) All slips must be checked for minimum information as given below.
(1) Complete patient identification.
(2) Requesting provider's signature.
(3) Ward number, clinic, or dispensary designation.
(4) Date and time of specimen collection.
(5) Test(s) requested.
(6) Admission diagnosis or type of surgery in the "REMARKS" section, if applicable.
(7) "URGENCY" box completed.
y. Forward Specimen to Laboratory. Prepare the specimen and request for transport, then forward to the laboratory IAW local policy.
z. Report and Record. Report accomplishment of the procedure to the supervisor and document the date, time, type of specimen collected, and disposition of the specimen on appropriate records IAW local policy.
