
Treating Chemical and Biological Agent Casualties
Lesson 2: Treating
Nerve Agent Poisoning
Section II: Treat Casualty
2-6
2-6. ADMINISTER THE FIRST NERVE AGENT ANTIDOTE
After the casualty is masked and hooded, you must administer injections of injections of atropine and 2-PAM chloride. A casualty with signs of severe nerve agent poisoning will be unable to administer antidote to himself. Administer all three kits of nerve agent antidote.
a. Obtain Autoinjector Kit. Remove one nerve agent antidote autoinjector kit from inside the pocket of the casualty's mask and carrier if the temperature is near or below freezing, the casualty may be carrying the autoinjectors in another location.
(1) If you cannot find the nerve agent antidote kits, look around the immediate area for unused autoinjectors. The soldier may have been trying to give himself an injection and dropped the autoinjectors when he was overcome by the nerve agent.
(2) If you do not find unused autoinjectors, look for used autoinjectors, attached to the casualty's clothing or lying near the casualty. The casualty may have been able to administer injections to himself before he was overcome by the agents. This is especially true if the casualty was masked when you found him. If he has already given himself one set of nerve agent antidotes, then administer the two remaining Mark I kits.
b. Locate and Prepare Injection Site. Normally, the injections are given in the casualty's thigh muscle. If the casualty is very thin, roll the casualty onto his chest so that his buttock is in position for the injection.
(1) Thigh. If you are going to inject the antidote into the casualty's thigh, position the casualty on his back and squat near his left thigh. Locate an area on the large muscle on the outer part of the casualty's right thigh. The site should be at least one hand's width above the hip joint and at least one hand's length above the knee. Do not inject in an area close to the casualty's knee or hip joint (figure 2-3A). Check the casualty's pocket to make sure that the needle will not hit anything in the pocket when you give the injection.
(2) Buttocks. If you are going to inject the antidote into the casualty's buttocks, position the casualty on his chest and squat near his left hip. Locate an injection site in the upper outer part of the casualty's left buttocks (figure 2-4A). If you inject the casualty in another part of his buttocks, you run the risk of hitting a major nerve or blood vessel. Check the casualty's pocket to see that the needle will not hit anything in the pocket when you give the injection. If the casualty's jacket is covering the injection site, lift the bottom of the jacket, since the needle may not penetrate the jacket.
c. Remove the Atropine Autoinjector.
(1) Grasp the autoinjector by the plastic clip in your left hand and make a fist around the clip. Hold the clip so that the larger (2- PAM chloride) autoinjector is on top and at eye level.
(2) Grasp the body of the smaller (atropine) autoinjector with the thumb and two fingers of your right hand.
(3) Pull the atropine injector out of the clip with a smooth motion. Do not cover or hold the green (needle) end of the autoinjector. This may cause the needle to function prematurely.
d. Administer the Atropine Autoinjector.
(1) Form a fist around the autoinjector. Do not touch the green end of the autoinjector. The autoinjector is now armed, and touching the green end could cause it to function prematurely.
(2) Place the green (needle) end of the autoinjector against the injection site (thigh or buttocks) so that the autoinjector is perpendicular to the muscle (figure 2-7).
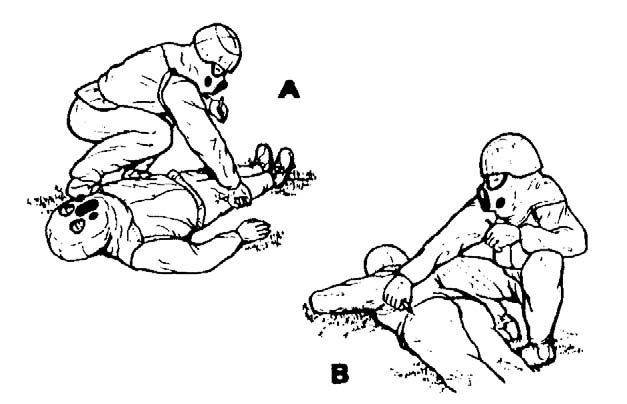
Figure 2-7. Administering nerve agent antidote to a casualty. (A) Thigh. (B) Buttocks.
(3) Apply firm, even pressure to the autoinjector until the needle functions (clicks). The coiled spring mechanism plunges the needle through the casualty's clothing and into the muscle. Do not use a jabbing motion to inject the antidote.
(4) Hold the autoinjector in place for at least ten seconds to ensure that all of the antidote has been injected.
(5) Remove the needle from the muscle by pulling the autoinjector away from the body in a smooth, straight motion.
e. Remove the 2-PAM Chloride Autoinjector.
(1) Carefully place the used atropine autoinjector between the little finger and ring finger of the hand holding the clip. Point the needle away from your hand. If you are not careful, the needle may puncture or tear your protective gloves.
(2) Grasp the body of remaining autoinjector in the clip (the 2-PAM chloride autoinjector) with the thumb and two fingers of your free hand).
(3) Pull the autoinjector out of the clip in a smooth motion. Do not touch or cover the black (needle) end of the autoinjector. This may cause the needle to function prematurely.
f. Administer 2-PAM Chloride.
(1) Form a fist around the autoinjector. Avoid touching the black end of the autoinjector.
(2) Place the black (needle) end of the autoinjector against the injection site (same muscle into which you injected the atropine) so that the autoinjector is perpendicular to the muscle.
(3) Apply firm, even pressure to the autoinjector until the needle functions and injects into the casualty's muscle.
(4) Hold the autoinjector in place for at least 10 seconds.
(5) Remove the needle from the muscle by pulling the autoinjector away from the body in a smooth, straight motion.
(6) Drop the clip without dropping the used autoinjectors.
(7) Carefully lay the used autoinjectors on the casualty's chest (if he is lying on his back) or on his back (if he is lying on his stomach). Point the needles toward his head.
g. Administer Second and Third Mark I Kits. Repeat the procedure immediately using the second and third sets of autoinjectors.
