
Treating Chemical and Biological Agent Casualties
Lesson 2: Treating
Nerve Agent Poisoning
Section I: Treat Self
2-3
2-3. ADMINISTER NERVE AGENT ANTIDOTE KIT (MARK I) TO SELF
a. Identify. The Mark I nerve agent antidote kit (NAAK) (figure 2-1) consists of four separate components: the atropine autoinjector, the pralidoxime chloride autoinjector, the plastic clip, and the foam envelop (carrying case).

Figure 2-1. Nerve agent antidote kit, Mark I.
(1) The atropine autoinjector consists of a hard plastic tube that has 2 mg (0.7 ml) of atropine. Its pressure activated coiled spring triggers the needle for injection. The plastic container is white. It has green identification and direction labels with white lettering. It has a yellow plastic safety cap attached at the rear of the container. At the needle end is a green plastic cap. When pressure is applied, the spring mechanism is activated.
(2) The 2-PAM Cl autoinjector is a hard plastic tube that dispenses 600 mg/2 ml of 2-PAM Cl (300 mg/ml) solution when activated. The pressure activated coil spring is identical to that of the atropine autoinjector. This container is clear plastic. It has a light brown identification label with black lettering. The directions are in black letters on a white background. The gray plastic safety cap is attached to the clip at the rear of the container. The needle end is black plastic.
(3) The clip is clear hard plastic. It is constructed to hold the pair of autoinjectors together while attached to their safety caps.
(4) The foam envelope is a charcoal gray foam fitting case with pressed seams. It is designed to carry both autoinjectors, and is used for shipping purposes only. Remove the envelope prior to putting the injectors in your mask carrier.
b. Administer. If you are having signs and symptoms of nerve agent poisoning, STOP BREATHING AT ONCE, AND DO NOT INHALE UNTIL YOU HAVE MASKED. After you have masked, and if you have signs and symptoms of nerve agent poisoning, follow the steps for administering the nerve agent antidote.
(1) Reach into the inside pocket of your protective mask carrier and take out the injector set.
(2) With your nondominant hand, grasp the set of injectors by the plastic clip so that the larger injector is on top. Position the set of injectors in front of you at eye level (figure 2-2A).
(3) With the other hand, check the injection site for buttons or objects in pockets that may interfere with the injection.
(4) Grasp the smaller autoinjector (containing the atropine) with the thumb and first two fingers (figure 2-2B) and pull the injector out of the clip with a smooth motion (figure 2-C).
(5) Form a fist around the auto-injector without covering or holding the needle (green) end.
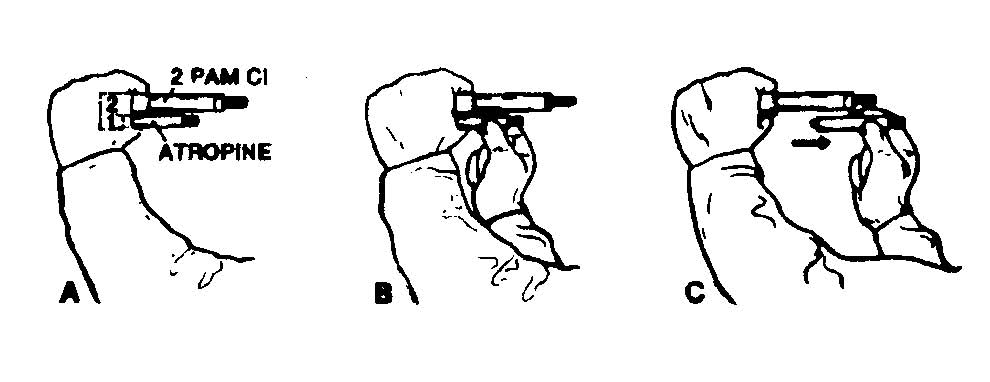
Figure 2-2. Removing the atropine autoinjector from the clip.
CAUTION: Holding or covering the needle (green) end of the autoinjector may
result in accidentally injecting your hand or fingers. If this happens, give
yourself another injection in the thigh or buttocks using another injector.
(6) Position the atropine autoinjector against the injection site and inject yourself.
(a) Place the green (needle) end of the injector against the outer thigh muscle (figure 2-3). Be careful not to inject close to the hip or the knee. If you have a thin thigh muscle, you should inject the atropine into the upper, outer quadrant of the buttocks to avoid injury to the thigh-bone (figure 2-4).
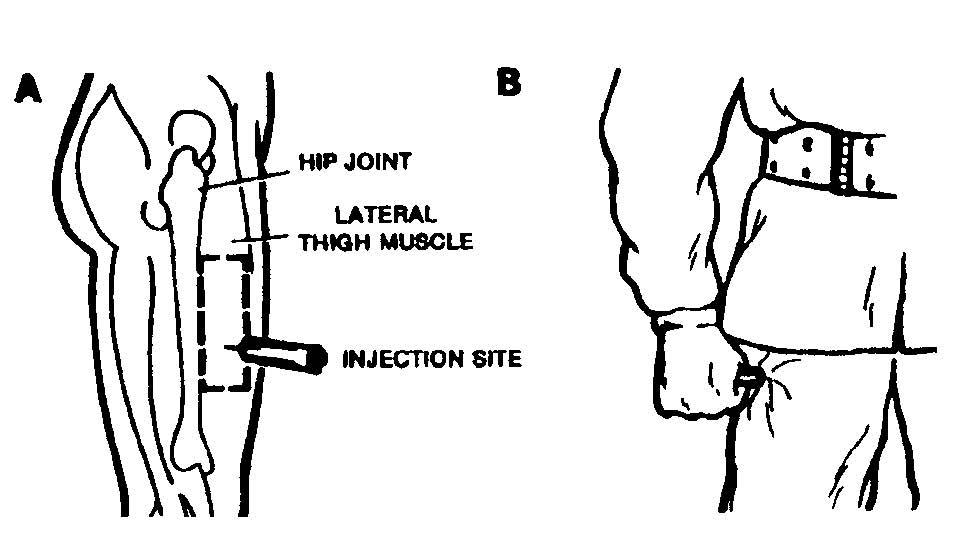
Figure 2-3. Injecting nerve agent antidote into your thigh.
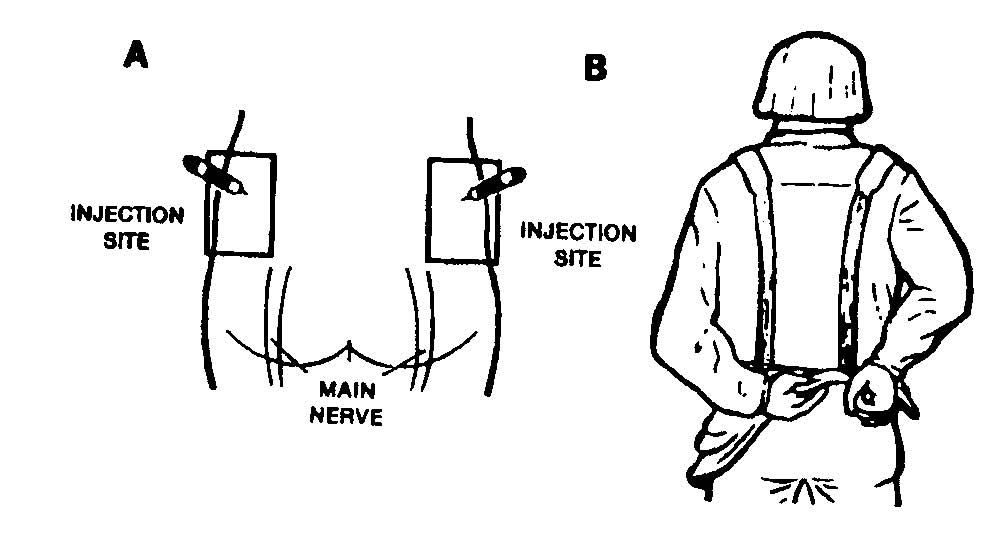
Figure 2-4. Injecting nerve agent antidote into your buttocks.
CAUTION: A nerve crosses the buttocks. It is important to inject into the upper,
outer quadrant only in order to avoid injuring the nerve and possibly
causing paralysis.
(b) Apply a firm, even pressure to the injector to activate the needle. This will cause it to penetrate both the clothing and the muscle.
CAUTION: DO NOT use a jabbing motion when injecting. This is not necessary
and may result in an improper injection or injury to the thigh or buttocks.
(c) Hold the injector in place for at least 10 seconds. The 10 seconds can be estimated by counting, "One thousand and one, one thousand and two," and so forth.
(7) Carefully remove the 2-PAM Cl autoinjector and place it between the little finger and ring finger of the hand holding the remaining injector/clip. DO NOT STICK YOUR HAND WITH THE
NEEDLE.
(8) Pull out the large injector (figure 2-5) the same way you pulled out the small one. Hold the black needle end against your outer thigh, or upper outer buttocks if you have a thin thigh, and inject yourself with the large autoinjector as you did with the small one.
(9) Drop the plastic clip that held the injectors without dropping the used injectors.
(10) Push the needle of each injector (one at a time) through the underside of the left flap of one of your undergarment's breast pockets (figure 2-6). The more recent overgarment will have the pocket on the sleeve.
(11) Bend the needle of each to form a hook.
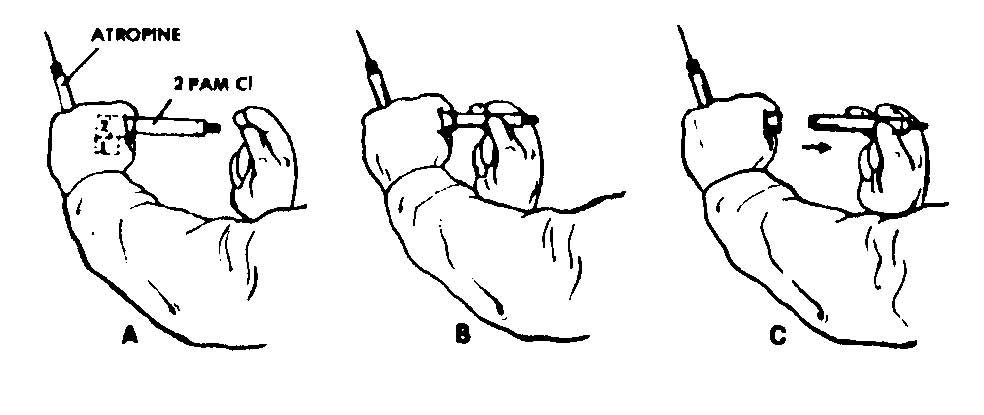
Figure 2-5. Removing the 2-PAM Cl autoinjector from the clip.
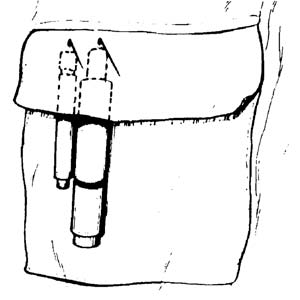
Figure 2-6. One set of autoinjectors attached to pocket flap.
CAUTION: It is important to keep track of all used autoinjectors, so that other
medical personnel can determine how much antidote has been given
and the proper follow-up treatment can be administered. Be careful not
to tear protective glove/clothing when bending the needles.
(12) Seek buddy-aid or medical aid. Administration of second and third sets of injections, if needed, most likely will be done by another soldier buddy since you probably will not be able to administer them to yourself.
CAUTION: If no assistance is available and symptoms persist 10 to 15 minutes
after the first set of injections, then self- administer a second set of
injections.
