LESSON ASSIGNMENT Paragraphs 3-1 through 3-5.
LESSON OBJECTIVES After completing this lesson, you should be able to:
3-1. Identify the purpose of a traction splint.
3-2. Identify the procedures for applying a Hare traction splint.
3-3. Identify the procedures for securing a traction splint to a litter.
SUGGESTION After completing the assignment, complete the exercises of this lesson. These exercises will help you to achieve the lesson objectives.
3-1. FRACTURED FEMUR
When a casualty suffers a complete fracture of the femur, the strong thigh muscles can contract and pull the ends of the fractured bone out of alignment. Once the two fractured ends of the femur are out of alignment, muscle contractions can then cause the fractured bone segments to slip and be side by side. This causes the thigh to “shorten.” These fractured ends can damage major blood vessels, nerves, and muscle tissues of the thigh.
3-2. PURPOSE OF A TRACTION SPLINT
The purpose of a traction splint is to immobilize and provide constant traction to the injured limb. The traction pulls the muscles of the thigh back to their normal length and allows the fractured femur to slip back into alignment.
a. The traction splint was developed by Sir Hugh Thomas, an orthopedic surgeon, who lived in Liverpool, England, during the 19th century. Traction splints used in the field include the Hare traction splint.
b. Traction splints are used only on the lower extremity, usually for a fracture of the femur. The traction places counter traction on the body. When traction is applied to the leg, the counter traction is applied against the bones of the pelvis. If the splint were to be applied to an arm, the splint would press against the axilla (armpit) region. Pressure in the axilla could damage blood vessels and nerves located in the region and seriously impair blood circulation.
3-3. APPLY THE HARE TRACTION SPLINT
a. Locate Fracture Site. As you perform your survey of the casualty, cut or tear the pants leg to expose the injury and locate the site of the fracture. Dress any open wounds on the leg before applying the traction splint. Check the casualty’s distal pulse.
b. Obtain Splint. Obtain the Hare traction splint set. The set contains the metal Hare splint with straps and ratchet, an ankle hitch, padding materials, and a litter bar. The Velcro straps provide support for the leg and secure the leg to the splint. The metal splint has a stirrup that lifts the splint off the ground.
c. Obtain Assistant. The Hare traction splint can be applied by two people. In the following instructions, the person helping you will be identified as the assistant. Instruct the assistant in his functions and provide help as needed.
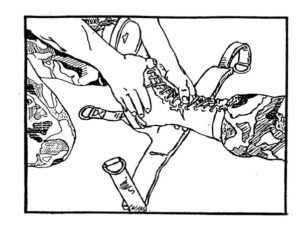
d. Stabilize the Injured Leg. Check for a pulse distal to the injury. Then grip the casualty’s ankle and foot as shown in figure 3-1. Apply sufficient traction to stabilize the leg to prevent movement at the site of the fracture.
e. Adjust Splint. Have the assistant adjust the telescoping splint to the right length and lock the rod in place using the following steps.
(1) Loosen the locking devices on the two metal rods of the splint so the bottom of the splint is free to slide.
(2) Lay the splint parallel to the casualty’s uninjured leg with the top of the splint even with the bottom of the casualty’s buttocks (at the ischium).
(3) Pull on the lower part of the splint until the bottom of the splint is 8 to 12 inches beyond the bottom of the casualty’s foot. Keep the top of the splint even with the ischium (the lower bone of the pelvis).
(4) Lock the splint in position.
(5) Test the splint to make sure the lower part of the splint is securely locked and will not slip.
(6) Position the splint next to the injured leg with the top of the splint even with the ischium on the casualty’s injured side.
f. Open and Position Support Straps. The splint has five straps, the ischial (top) strap and four Velcro leg support straps. Have the assistant open all five straps and position the four Velcro support straps in the following positions:
(1) Position the first leg support strap (first strap below the ischial strap) so it will secure the thigh above the fracture site.
(2) Position the second leg support strap so it will secure the thigh below the fracture site.
(3) Position the third leg support strap so it will secure the lower leg below the knee.
(4) Position the fourth leg support strap so it will secure the lower leg above the ankle.
g. Prepare Ratchet. Have the assistant release the ratchet, pull the traction strap over the top of the ratchet, and place the “S” hook so the hook hangs off the splint.
h. Apply the Ankle Hitch to the Boot. Have the traction assistant apply the ankle hitch in the following manner:
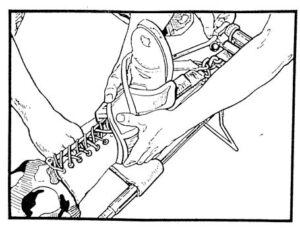
(1) Slide the three-ringed ankle strap under the heel of the casualty’s boot with the padded side of the strap against the foot. Place the bottom edge of the heel even with the lower edge of the sponge padding as shown in figure 3-1.
NOTE: You will need to change your grip on the casualty’s ankle and foot to allow the assistant to apply the traction strap while you maintain your support. After the strap is applied, your hands should be over the “X.”
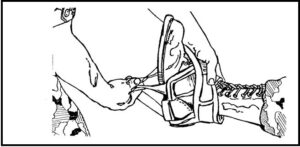
(2) Crisscross the side straps high over the casualty’s instep so the straps form an “X.”
(3) Bring the ends of the crisscrossed straps down to meet the center strap. Hold all three straps in place.
(4) Twist the center strap until it is even with the two side straps, all three straps can be firmly grasped, and the three “D” rings at the end of the straps are together (see figure 3-2).
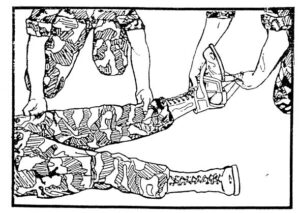
i. Apply Manual Traction. Have the assistant position himself at the casualty’s injured thigh and gently support the thigh above and below the fracture site. Apply increased gentle, longitudinal manual traction to the casualty’s limb. In unison with the assistant, lift the casualty’s injured leg so the splint can be slipped beneath the leg (see figure 3-3).
NOTE: Traction and lift can be applied by leaning back. Apply only enough traction to align the limb to fit into the splint. Do not try to align the fracture fragments anatomically. Once you have applied increased traction, maintain the traction until the splint is in place and providing the traction.
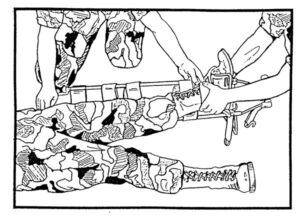
j. Position the Splint. While maintaining traction, have the assistant use one hand to support the fracture site and slide the splint into position under the casualty’s hip and limb with his other hand (see figure 3-4). The ischial ring of the splint should be seated where the thigh joins the buttocks (on the ischial tuberosity).
k. Lower Leg Into Splint. Upon your command, lower the casualty’s leg into the cradle of the splint in unison with the assistant. Maintain traction as you and the assistant lower the limb. After the limb is in position, have the assistant remove the hand supporting the fracture site and prepare to secure the limb to the splint.
l. Apply the Ischial Strap. Have the assistant perform the following steps.
(1) Make sure the ischial ring is seated on the ischial tuberosity.
(2) Place padding around the groin area and where the ischial strap will cross the thigh.
(3) Bring the ischial strap over the top of the casualty’s thigh; then secure and tighten the ischial strap (strap has a buckle). Do not tighten the strap tight enough to impair circulation.
(4) Check the casualty’s distal pulse. If the strap is interfering with circulation, loosen the strap and check the pulse again.
m. Apply Traction Using the Splint. Have the assistant perform the following steps.
(1) Have the assistant move to the ankle hitch and hold the traction straps again so that the three “D” rings are together.
(2) Slip the three “D” rings over the free end of the “S” hook.
(3) Tighten the traction strap to provide enough traction to maintain the limb’s alignment (see figure 3-5).
CAUTION: Some models do not have a ratchet mechanism to tighten the strap. When a ratchet mechanism is used, do not apply undue traction to the limb. Overstretching the limb can cause further injury to the limb.
(4) Once the traction has been applied by the traction strap, you can lean forward and relax your manual traction. Continue to support the leg at the ankle until the remainder of the splint straps have been applied.
n. Secure Velcro Support Straps. The medical leader secures the four Velcro support straps so the limb is securely held in the splint.
(1) Tighten the straps on the thigh above the fracture, on the thigh below the fracture, below the knee, and above the ankle.
(2) Check the distal pulse after tightening each strap.
(3) If the strap interferes with the blood circulation, loosen the strap and secure it again.
o. Place Casualty on Litter. Once the traction splint has been applied, the casualty is moved to the litter using the procedures given in paragraph 3-4.
CAUTION: Once the traction strap has been applied, do not release the traction. Traction should only be released by a medical officer. If the strap becomes loose, have the traction assistant administer manual traction; then tighten and secure the strap again.
p. Support the Lower Limb. Position yourself next to the casualty’s injured leg at the tibial area. Place both hands under the casualty’s thigh, one above the fracture site and one below the fracture site. Manually support and stabilize the injured limb to prevent any movement at the fracture site. Continue providing support and stabilization as the traction assistant applies the ankle hitch and splint.
3-4. PLACE A CASUALTY WITH A TRACTION SPLINT ON A LITTER (LITTER BAR)
After the traction splint has been applied, attach the litter bar to the litter, place the casualty onto the litter, and secure the stirrup to the litter bar.
a. Attach Litter Bar. The litter bar attaches to the litter poles at the foot end of the litter. The litter bar locks the bottom of the splint support (stirrup of the Hare splint) in position. This helps to keep the leg immobile when the casualty is moved (carried by a litter team or placed in an evacuation vehicle).
(1) Place the litter bar on the litter poles at the end of the canvas bed of the litter. This position will keep the litter bar from interfering with the litter handles when carrying the litter or locking the litter in place in an evacuation vehicle.
(a) The strap attached to the bar should be free to go under the litter.
(b) The groove of the bar should be up.
(c) The locking cam on one side of the bar should be on the same side of the litter as the traction splint will be when the casualty is placed on the litter.
(d) Make sure the cam is in the open (unlocked) position.
(2) Pass the strap beneath the litter to the other side of the litter bar.
(3) Secure the litter bar by fastening the buckle at the end of the strap into the end of the litter bar and tightening the strap if needed.
b. Place Casualty on Litter.
(1) Place the litter next to and parallel with the casualty.
(2) Prepare to lift the casualty.
(a) If three people (bearers) are available, one bearer places his hands under the casualty’s back and waist; the second places his hands under the casualty’s hip and the calf of the uninjured leg; and the third places his hands under the traction splint.
(b) If only two people are available, one bearer slips his hands under the casualty’s back and waist and the other bearer slips his hands under the casualty’s thighs and calves.
(3) Upon commands of the leader, the bearers lift the casualty in unison, move the casualty over the litter, and lower the casualty onto the litter in unison.
c. Secure Splint Support to Litter Bar.
(1) Place the bottom of the splint support (stirrup) in the groove on the litter bar.
(2) Turn the cam and lock the splint support firmly in place.
d. Lift the Litter. Lift the litter using the appropriate litter carry and evacuate the casualty. Litter carries are presented in Subcourse MD0001, Evacuation in the Field.
3-5. SECURE THE SPLINT SUPPORT TO THE LITTER USING A ROLLER BANDAGE
If you do not have a litter bar, the splint support (stirrup) can be secured to the litter using a roller bandage or similar material.
a. Place the casualty onto the litter so the splint support is on the canvas bed of the litter.
b. Secure the end of the roller bandage to the outside of the splint support where the splint support meets the outer rod of the splint. (See figure 3-6 A).
c. Bring the roller bandage down over the near litter pole and encircle the pole close to the canvas bed with two turns of the bandage.
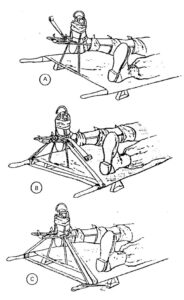
d. Bring the roller bandage under the litter to the far litter pole.
e. Encircle the pole close to the canvas bed with two turns.
f. Carry the roller bandage to the inside rod of the splint where it joins the litter support.
g. Wrap the bandage around the site where the splint support meets the inner rod of the splint with two turns. (See figure 3-6 B).
h. Carry the bandage back around in the reverse direction (two turns around the far litter pole, under the litter, and two turns around the near litter pole).
i. Secure the roller bandage to the place where the splint support meets the outside splint rod (the location where you began) so the bandage will not come undone; then cut the bandage (see figure 3-6 C).
