2-5. IMMOBILIZING A CASUALTY’S NECK WITH CASUALTY LYING DOWN
After making sure the casualty is breathing and all severe bleeding has been controlled, immobilize the casualty’s spine. If possible, take measures to immobilize the casualty’s neck before placing the casualty on a spine board. The following procedures assume the casualty is lying on his back and you have at least one other person to assist you. If you are the only medical person available, you should apply traction and supervise the application of the cervical collar to the casualty’s neck.
a. Apply Manual Traction. Immobilize the casualty’s head and neck by applying gentle manual traction.
(1) Kneel behind the casualty’s head, facing the casualty.
(2) If needed, gently remove the casualty’s helmet.
CAUTION: Only remove a helmet if it is necessary to treat an airway problem or interferes with proper spinal immobilization.
(3) Place your hands on the sides of the casualty’s head with your palms over the casualty’s ears and your fingers supporting the casualty’s mandible (jaw) as shown in figure 2-4.
(4) Pull back slightly to apply gentle traction. Maintain the traction until the casualty has been secured to the spine board.
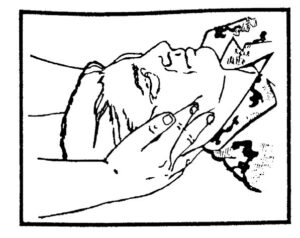
b. Apply Cervical Collar. A cervical collar is a rigid device that, when properly placed around the casualty’s neck, prevents the casualty from bending his neck. It also provides support to the jaw, thus helping to immobilize the casualty’s head. If a cervical collar is available, have your assistant apply the collar to the casualty’s neck. If a cervical collar is not available, improvise a collar from a SAM splint or from material such as a folded towel, T-shirt, or field jacket. The following procedures can be used to improvise a cervical collar from a towel or other materials at hand.
NOTE: Prior to applying the cervical collar you should assess the casualty’s neck for step off’s, jugular vein distention, and tracheal deviation.
(1) Fold the material so it can be slipped under the casualty’s neck.
(2) Slide one end of the folded material under the casualty’s neck.
(3) Wrap the material around the casualty’s neck without moving his head or neck.
(4) Fasten the material in place using pins, tape, or a cravat.
(5) Check the collar for tightness. It should support the neck without interfering with the casualty’s breathing.
c. Place Casualty on Long Spine Board. Place and secure the casualty to a long spine board using the procedures given in paragraph 2-6 or paragraph 2-7.
2-6. IMMOBILIZING A CASUALTY USING A LONG SPINE BOARD AND LOG ROLL
The log roll technique is the preferred method of placing a casualty with a spinal injury onto a long spine board. The technique requires four people (yourself and three assistants). You should maintain manual traction of the casualty’s head while supervising your assistants.
a. Position Long Spine Board. Have an assistant obtain a long spine board and place it next to and parallel with the casualty.
b. Secure Wrists. If the casualty is unconscious, have an assistant place the casualty’s wrists together at his waist and tie them together loosely without compromising circulation. A cravat is normally used to secure the wrists. Securing the casualty’s wrists will make it easier to position him on the long spine board and will keep his arms from moving off the spine board.
c. Brief the Casualty. Tell the casualty that you are going to place him onto the spine board. Tell the casualty that he should not try to move; the assistants and you will move him without any effort on his part.
d. Position Assistants. Have the three assistants kneel on the same side of the casualty (the side away from the spine board) as shown in figure 2-5. If one of the assistants is more experienced than others, place him at the casualty’s chest.
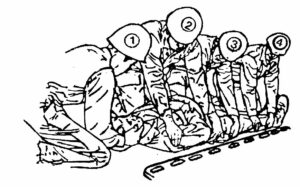
(1) Have the first assistant kneel near the casualty’s chest and reach across the casualty. Have him place one hand at the casualty’s far shoulder and the other at the casualty’s waist.
(2) Have the second assistant kneel near the casualty’s hips and reach across the casualty. Have him place one hand at the casualty’s far hip and the other at the casualty’s far thigh.
(3) Have the third assistant kneel near the casualty’s lower legs and reach across the casualty. Have him place one hand at the casualty’s far knee and the other at the casualty’s far ankle.
e. Roll Casualty. Upon your command, have the three assistants roll the casualty slightly toward them in unison. As they roll the casualty, turn his head slightly to keep it in alignment with his spine.
NOTE: While the casualty is on his side, the back should be assessed for step off’s, deformities, contusions, abrasions, punctures penetrations, burns, lacerations, and swelling (DCAP-BLS) and for tenderness, instability, and crepitation (TIC) as well as for rectal bleeding.
f. Slide Board Into Position.
(1) If a fourth assistant is available, have him slip the spine board under the casualty.
(2) If a fourth assistant is not available, have the middle (second) assistant release his hold on the casualty’s hip, grasp the closest edge of the spine board, and slide it against the casualty. Then have him release the board, reach across the board, grasp the far edge, and hold the board in place so it will not slip as the casualty is placed on the board.
NOTE: If needed, all three assistants can release one of their holds on the casualty to help move the spine board beneath the casualty. If this is done, the first and third assistants return to supporting the casualty with both hands while the second assistant uses one hand to prevent the spine board from slipping.
g. Position Casualty on Board. Have the assistants slowly lower the casualty in unison, allowing the casualty’s back to rest on the spine board. As they lower the casualty, turn his head slightly to keep it in alignment with his spine. Position the casualty with his body in the middle of the spine board.
h. Place Padding Beneath the Casualty. Have the assistants slip padding (folded towels, jackets, and so forth) at the natural curves beneath the small of the casualty’s back, beneath his knees, and beneath his ankles. Have an assistant place additional padding beneath the casualty’s neck.
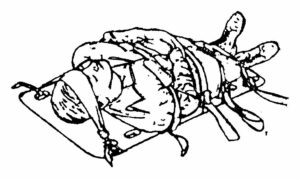
i. Secure Casualty to Board. Have the assistants secure the casualty to the long spine board using patient securing straps and cravats as shown in figure 2-6.
(1) Secure the casualty’s chest (and upper arms if straps are long enough), hips, thighs, and lower legs to the spine board using the patient securing straps. Cravats or strips of cloth can be used if securing straps are not available.
(2) Secure the casualty’s head to the spine board with a cravat. Folded material or socks filled with sand may be placed at each side of the casualty’s head before the cravat is applied to provide additional stability.
NOTE: The head is secured last to allow it to remain in-line with the body through-out the securing process.
2-7. IMMOBILIZING A CASUALTY USING A LONG SPINE BOARD AND STRADDLE-SLIDE
The straddle-slide technique is used to place a casualty with a spinal injury on a long spine board when limited space makes it impossible to use the log roll technique. The straddle-slide technique requires five people (yourself and four assistants). You should maintain manual traction of the casualty’s head while supervising your assistants.
a. Obtain Long Spine Board. Have the fourth assistant obtain a long spine board.
b. Secure Wrists. If the casualty is unconscious, have an assistant place the casualty’s wrists together at his waist and tie them together loosely with a cravat. The casualty’s circulation should not be impaired.
c. Brief the Casualty. Tell the casualty that you are going to place him onto the spine board. Tell the casualty that he should not try to move; the assistants and yourself will move him without any effort on his part.
d. Position Yourself and Assistants. Squat so that you can maintain traction and have your feet spread wide apart. Position the assistants as follows.
(1) Have the first assistant face you, straddle the casualty’s chest, and place his hands under the casualty’s armpits.
(2) Have the second assistant face you, straddle the casualty’s hips, and place his hands on the outsides of the casualty’s hips.
(3) Have the third assistant face you, straddle the casualty’s lower legs, and place his hands on the outside of the casualty’s lower legs.
(4) Have the fourth assistant (the assistant with the spine board) stand behind you and face your back. Have him position the spine board so it can be slipped beneath the casualty.
e. Lift Casualty. Upon your command, have the first three assistants lift the casualty slightly in unison. As they lift the casualty, lift his head slightly to keep it in alignment with the spine.
f. Slide Board. Have the fourth assistant slide the long spine board between your feet and the feet of the other three assistants. The board should be positioned so the casualty will be in the middle of the board when he is lowered.
g. Lower Casualty. Have the first three assistants slowly lower the casualty in unison so the casualty is in the middle of the board. As they lower the casualty, lower his head to keep it in alignment with his spine.
h. Place Padding Beneath the Casualty. Next, have the assistants slip padding beneath the natural curves at the small (arch) of the casualty’s back, his knees, his ankles, and his neck.
i. Secure Casualty to Board. Finally, have the assistants secure the casualty’s head, chest, hips, thighs, and legs to the long spine board using straps, cravats, and/or strips of cloth while you maintain the cervical traction.
2-8. IMMOBILIZING A CASUALTY’S SPINE WITH CASUALTY SITTING UP
If the casualty was riding in a vehicle when it was involved in an accident, he may be in a sitting position. After making sure the casualty is breathing and all severe bleeding has been controlled, immobilize the casualty’s spine by applying a cervical collar and a short spine board to the casualty before removing him from the vehicle. The following procedures assume the casualty is in a sitting position and you have at least one other person to assist you by applying a cervical collar and short spine board while you apply traction. Direct the assistant as needed.
a. Apply Manual Traction. Immobilize the casualty’s head and neck by applying gentle manual traction.
(1) Position yourself behind the casualty and face the casualty.
(2) Place your hands on both sides of the casualty’s head with your palms over the casualty’s ears and your fingers supporting the casualty’s mandible (jaw) as shown in figure 2-7.
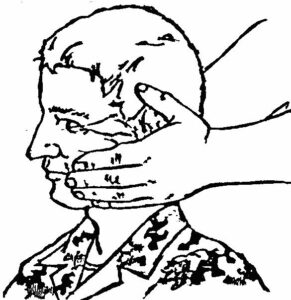
(3) Apply and maintain manual traction until the casualty has been secured to the spine board. The casualty should be in an “eyes forward” position.
b. Apply Cervical Collar. If a cervical collar is available, have the assistant apply the collar to the casualty’s neck. If a cervical collar is not available, have the assistant improvise a collar from a SAM splint or from material such as a folded towel, T-shirt, or field jacket. Apply an improvised material collar following the procedures given in paragraph 2-5b.
c. Position Short Spine Board. Have the assistant position the short spine board in the manner described below. If a short spine board is not available, improvise using a plank and cravats or other nearby materials.
(1) Position the spine board next to the casualty with the head (narrow) end of the board up.
(2) Slip the spine board between the casualty’s back and the seat of the vehicle by pushing the board as far into the seat behind the casualty as possible.
(3) Tilt the upper end of the board toward the head.
d. Secure Casualty’s Head to Short Spine Board.
(1) Position the back of the casualty’s head against the spine board. Make sure you move the head and neck as a unit. The casualty will be in an upright position.
(2) If a cervical collar has not been applied to the casualty, have the assistant place a roll of material in the hollow space between the neck and the board to help keep the neck in its normal position when the casualty is removed from the vehicle. The roll should be large enough to fill the gap, but not large enough to exert pressure on the neck.
(3) If available, have the assistant place a support (rolled towel, blanket, sandbag, or similar material) next to each side of the casualty’s head before securing the casualty’s head. The additional material will help to prevent motion. The supports and the head are secured as a single unit.
(4) Have the assistant secure the casualty’s head to the board using a head strap or cravat (see figure 2-8). Once the casualty’s head is firmly secured, you can release your hold on the casualty’s head.
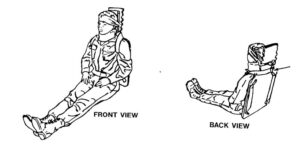
e. Secure Casualty’s Back to Short Spine Board. Secure the casualty’s back to the spine board using two body straps or improvised straps (see figure 2-8).
(1) Place the buckle of the first body strap in the casualty’s lap.
(2) Pass the other end of the strap through the lower hole in the board, up the back of the board, through the top hole, under the casualty’s armpit, up over his shoulder (same side as armpit), and across the back of the board at the neck.
(3) Take the second body strap and buckle it to the end of the first body strap (the end at the back of the board near the casualty’s neck). The buckle should rest on the back of the spine board and not press on the casualty’s neck.
(4) Continue to secure the casualty by bringing the strap around the back of the board, over the casualty’s unsecured shoulder, down and under his armpit, through the top hole on that side of the board, down the back of the board, through the lower hole, and across the casualty’s lap.
(5) Secure the end of the second body strap to the buckle of the first body strap. Both shoulders are secured to the top of the board’s body and the bottom of the board is secured to the casualty’s waist (see figure 2-8).
f. Secure Casualty’s Wrists. If the casualty is unconscious, place the casualty’s wrists together in his lap and tie them together loosely with a cravat. Make sure the cravat does not interfere with blood circulation.
g. Position Long Spine Board. Once the casualty has been partially immobilized with the short spine board, position him on a long spine board. If a long spine board is not available, use a wide plank or similar object.
(1) Have the assistant obtain the long spine board and open the vehicle door on the opposite side of the casualty. If the casualty is located on the driver’s side of the front seat, for example, the assistant will open the door on the passenger’s side of the front seat.
(2) Have the assistant position the long spine board flat on the seat perpendicular to the casualty.
(3) Have the assistant slide the long spine board on the seat until the end of the board is against the casualty’s buttocks.
(4) Tip the casualty slightly and have the assistant continue to move the board until the end of the long spine board is beneath the casualty’s buttocks. This will make it easier to place the casualty on the long spine board.
h. Lay Casualty on Long Spine Board. Turn the casualty in the seat so his back is toward the opened door (back toward long spine board) and lay him on the long spine board.
(1) Check the casualty’s feet. If they are tangled up in the pedals, move the feet until they are free.
(2) Turn the casualty by working in unison with the assistant.
(a) Grasp his upper body area (under his arms). Do not grasp the short spine board when moving the casualty.
(b) Have the assistant grasp the casualty’s lower legs.
(c) Pivot the casualty’s body as the assistant lifts the casualty’s legs onto the seat. You and the assistant must work in unison to prevent additional injury to the casualty.
(3) Have the assistant help you lay the casualty on the long spine board in a slow and gentle manner. The casualty’s trunk is now in a horizontal position.
(4) Have the assistant help you to lift the casualty’s body and legs and slide the long spine board beneath the casualty’s entire body. If the casualty is properly secured to a short spine board and there is not enough room to lift the casualty, slide the casualty onto the long spine board.
i. Remove Casualty From Vehicle. Once the casualty has been positioned on the long spine board, remove the casualty from the vehicle.
(1) Have the assistant join you at your door. You should be on one side of the long spine board (right or left) and the assistant should be on the other side.
(2) Lift the long spine board and remove the casualty from the vehicle.
j. Secure Casualty to Long Spine Board.
(1) Secure the short spine board to the long spine board. If possible, line up the strap holes of the short spine board with the holes of the long spine board and secure the two boards together. Do not remove the short spine board.
(2) Secure the casualty to the long spine board using available straps, cravats, or strips of cloth.
(3) Assess the casualty’s pulse, motor, and sensory each time after the casualty is moved and after the casualty has been secured to the long spine board.
2-9. TRANSPORTING A CASUALTY WITH A SPINAL INJURY
Record the treatment given the casualty on a U.S. Field Medical Card and attach the card to the casualty’s clothing. Open a standard litter and place it on the ground near the casualty. Have at least four bearers lift the long spine board in unison, move the casualty over the litter, and gently lower the long spine board in the middle of the litter in unison. Keep the board and the casualty as level as possible during the procedure. Evacuate the casualty using an appropriate four-man litter carry as described in Subcourse MD0001, Evacuation in the Field. If a litter is not available, the casualty can be evacuated using the long spine board as the litter. If a short spine board has been applied, the casualty must be placed on a long spine board or litter before being evacuated.
2-10. IMMOBILIZING A CASUALTY’S SPINE USING THE GROUND AS SPLINT
If you suspect a casualty has a spinal injury, you can use the following steps to temporarily immobilize the casualty on the ground while you obtain a long spine board and assistance.
a. Tell the casualty to keep still.
b. If the casualty is lying on his back, place padding to help support and immobilize his spine (see figure 2-9).
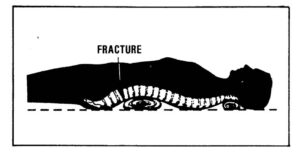
(1) Roll or fold padding (such as a blanket) until it conforms to the shape of the arch of his back. Then carefully slide the padding under the arch of his back.
(2) Slide a roll of cloth under the casualty’s neck to help support and immobilize his neck.
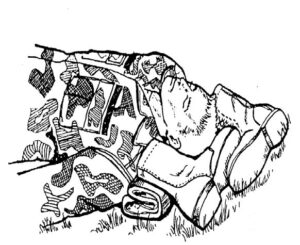
c. Place padded rocks, small padded logs, or filled boots on each side of the casualty’s head to keep it from moving. The procedure for using filled boots is described below.
CAUTION: Do not remove the casualty’s boots if you are in a chemical environment.
(1) Remove the casualty’s boots.
(2) Fill the boots almost to the top with sand or small rocks.
(3) Place material (strip of clothing, sock, and so forth) on top of the sand or rocks in each boot to keep the sand or rocks from falling out.
(4) Tie the top of each boot to keep the material in place.
(5) Place the boots around the casualty’s head so the head will not turn (see figure 2-10).
2-11. TURNING A CASUALTY ONTO HIS BACK
The preceding paragraphs have dealt with a casualty in a supine or sitting position. If the casualty is lying on his abdomen, leave him in this position while you perform your survey of the casualty.
a. To turn the casualty onto his back, obtain the assistance of three or more people, if possible. The procedure for turning a casualty with a possible spinal injury onto his back is similar to those used for the log roll. Keep the casualty’s head, neck, and back in alignment during the turn.
(1) Position yourself at the casualty’s head and apply gentle manual traction to his head.
(2) Have the assistants kneel on the same side of the casualty at the casualty’s chest, hips, and lower legs.
(3) Have the assistants reach across the casualty and secure holds on the casualty’s far side at his shoulder, waist, hip, thigh, knee, and ankle.
(4) Upon your command, have the assistants gently roll the casualty onto his back. All members must work in unison and keep the casualty’s spine in alignment. As the assistants turn the casualty, turn his head so his face is up when the turning is completed.
b. Do not attempt to turn the casualty by yourself unless you must risk injury to the casualty in order to save his life (administer rescue breathing to a nonbreathing casualty, remove the casualty from a burning building, and so forth). If you must turn the casualty and no other help is available, keep the casualty’s head, neck, and back in alignment as much as possible when turning the casualty.
